Walking into a professional recording studio for the first time can be equal parts inspiring and intimidating. All that gleaming gear, the stacked rack units, the sea of cables — it can make building your own studio feel like an impossible dream. But here’s the truth: you don’t need any of that to get started.
Armed with a laptop, a DAW, a microphone, and studio monitors, all for under $1,500, you can kick off your recording journey today. This guide is your complete recording studio equipment checklist — a modular roadmap that scales with your budget and ambitions, from your very first bedroom setup all the way to a full commercial studio.
Whether you have $500 or $50,000 to spend, you’ll know exactly what to buy at every stage.
Quick Summary: The Must-Have Starter Kit
If you just need the essentials to start recording today, here’s the core kit:
- Computer/Laptop — The command center of your studio
- DAW (Digital Audio Workstation) — Your digital canvas for recording, editing, and mixing
- Audio Interface — Converts analog sound into digital data your computer understands
- Microphone — Your primary tool for capturing sound
- Studio Headphones — For accurate, uncolored monitoring
- XLR Cable & Mic Stand — The physical infrastructure that holds it all together
- Pop Filter — Removes plosives and protects your mic’s diaphragm
Interactive Recording Studio Checklist
Use the checklist below to track exactly where your studio stands. Check off each item as you acquire it — your progress saves automatically in your browser.
0 of 26 items checked
Core Recording Essentials
Accuracy & Acoustics
Expanding Channels & Sound Character
High-End Signal Chain
Complete Recording Studio Equipment Checklist at a Glance
| Stage | Equipment | Purpose |
|---|---|---|
| Beginner | Computer/Laptop | Record, edit, and mix music |
| Beginner | DAW Software | Your digital recording and editing canvas |
| Beginner | Audio Interface | Convert analog signals to digital and back |
| Beginner | Condenser Microphone | Capture vocals and acoustic instruments |
| Beginner | Dynamic Microphone | Capture loud sources, live performances |
| Beginner | Studio Headphones (Closed-Back) | Isolated monitoring during recording |
| Beginner | Pop Filter | Reduce plosives, protect mic diaphragm |
| Beginner | XLR Cables | Balanced audio signal transmission |
| Beginner | Mic Stand & Shock Mount | Position and isolate the microphone |
| Intermediate | Studio Monitors | Flat, accurate reference listening for mixing |
| Intermediate | Monitor Isolation Pads | Decouple monitors from desk surface |
| Intermediate | Studio Workstation | Purpose-built desk for studio workflow |
| Intermediate | Bass Traps | Absorb low-frequency room buildup |
| Intermediate | Acoustic Panels | Absorb mid/high-frequency reflections |
| Intermediate | Acoustic Diffusers | Scatter sound waves to preserve liveness |
| Intermediate | MIDI Keyboard Controller | Play and control virtual instruments |
| Intermediate | External SSD / Hard Drive | Store projects, samples, and backups |
| Semi-Pro | Rack Mount | House and organize outboard gear |
| Semi-Pro | Multi-Channel Mic Preamp | More inputs and better gain for multi-track recording |
| Semi-Pro | Headphone Amplifier | Multiple headphone outputs for band sessions |
| Semi-Pro | Power Conditioner | Protect gear from surges and electrical noise |
| Semi-Pro | DI Box | Clean direct recording for guitar and bass |
| Semi-Pro | Monitor Management System | Route monitors and headphones efficiently |
| Semi-Pro | Electronic Drum Kit | Versatile, quiet alternative to acoustic drums |
| Pro | Standalone A/D Converters | Premium digital conversion for mastering-grade quality |
| Pro | Master Clock | Precisely synchronize all digital devices |
Stage 1: The Beginner Recording Studio Equipment List
This is where every studio is born — a desk in a bedroom, a corner of the living room, or a cleared-out garage space. You don’t need much to get real recordings made. The following items are your non-negotiables.
1. Computer or Laptop — The Command Center
In modern music production, everything revolves around the computer. It’s where you’ll record tracks, edit takes, run plugins, and export your final mixes. For most beginners, the question isn’t Mac versus PC — it’s whether your current machine is up to the task.
Key Specs to Look For
Processor: An Intel Core i5 or i7 (or AMD Ryzen 5/7 equivalent) is the modern minimum. Avoid dual-core processors — running a DAW with multiple tracks, plugins, and virtual instruments will push them to their limit immediately.
RAM: 16GB is the new standard minimum. While 8GB can work for simple sessions, DAWs, sample libraries, and plugin suites are increasingly memory-hungry. 16GB gives you real headroom, and 32GB is ideal if your budget allows.
Storage: An SSD (Solid State Drive) is essential — not optional. HDDs are too slow for real-time audio playback, especially once you’re running 20+ tracks. Aim for at least a 512GB internal SSD, and pair it with an external drive for project storage (more on that in Stage 2).
Laptop vs. Desktop: A laptop is ideal if you record on location or move between spaces. A desktop offers more performance per dollar and unlimited upgradeability. Use what you have, then upgrade with your goals in mind.
Pro Tip: Keep your studio computer dedicated to music production. Avoid installing unnecessary software, keep it updated, and invest in a laptop cooler if it runs hot — thermal throttling will wreck your sessions.
→ See our full guide to the best laptops for music production.
2. DAW — Digital Audio Workstation
Your DAW is the brain of your studio software — the platform where you record audio, arrange MIDI, mix tracks, and apply effects. Choosing the right one is one of the most important decisions you’ll make as a producer.
Popular DAW Options by Use Case
Ableton Live is the go-to for electronic music, beat-making, and live performance. Its Session View is unlike anything else on the market. Logic Pro (Mac only) is arguably the best value in professional DAWs — a one-time $199 purchase with world-class plugins included. Pro Tools remains the industry standard in commercial studios and post-production houses. Reaper offers professional-grade features for around $60 — an unbelievable value for beginners on a tight budget. GarageBand (Mac/iOS, free) is a legitimate starting point and a direct pipeline into Logic Pro when you’re ready to upgrade.
Pro Tip: Most audio interfaces bundle a “Lite” version of a DAW. Check your interface’s included software before purchasing a DAW separately. The Focusrite Scarlett series includes Ableton Live Lite and Pro Tools Intro — that’s free recording software worth hundreds of dollars.
→ Read our comprehensive reviews of the best paid and free DAW software.
3. Audio Interface — The Gateway
An audio interface is the bridge between the physical world of sound and the digital world of your DAW. It converts the analog signals from your microphones and instruments (A/D conversion) into digital data your computer can process, and then converts that digital audio back into analog signals for your monitors and headphones (D/A conversion).
Beyond simple conversion, modern interfaces also function as mic preamps, headphone amplifiers, and direct monitoring mixers. The quality of an interface’s preamps directly affects how clean and detailed your recordings sound.
Our Top Recommendation: Focusrite Scarlett Solo 4th Gen
For solo artists, podcasters, and bedroom producers, the Focusrite Scarlett Solo 4th Gen is the gold standard beginner interface. It features a 120dB dynamic range, ultra-low-noise preamp, a dedicated Hi-Z guitar input, and the acclaimed Air Mode that adds presence and harmonic character to vocals and instruments. It ships with Ableton Live Lite and Pro Tools Intro.

If you need two simultaneous microphone inputs (useful for recording two people or a guitar + vocal at once), step up to the Focusrite Scarlett 2i2 4th Gen — still one of the best-selling interfaces in the world.
What to Look for in a Beginner Interface
Look for phantom power (48V) — essential for condenser microphones. Ensure it has the number of I/O channels you need now, plus a couple of spares for the future. USB-C connectivity is increasingly standard and future-proof. Confirm it’s compatible with your DAW and operating system before purchasing.
→ Explore all our picks in our best audio interface guide.
4. Microphones — Your Primary Ears
Taking time to understand how different microphones work and when to use them is one of the highest-leverage skills in home recording. Professional studios stock 20+ microphones — but they all started with one or two. Here’s what you need to know.

The Three Types of Studio Microphones
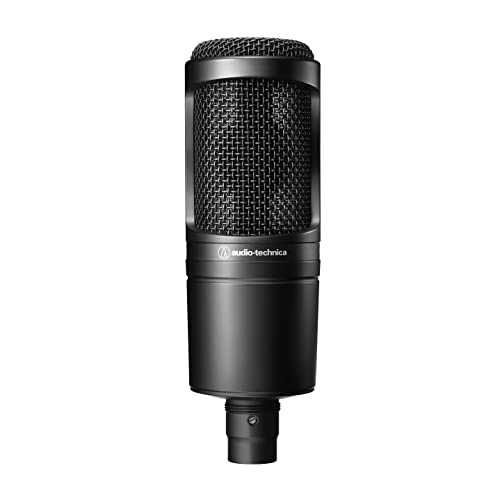
Condenser Microphones are the workhorses of studio recording. Their extended frequency range and sensitivity make them ideal for vocals, acoustic guitars, drum overheads, and most studio applications. They require phantom power from your interface. Large Diaphragm Condensers (LDC) are the standard for vocals; Small Diaphragm Condensers (SDC) excel on acoustic instruments with sharp transients. The Audio-Technica AT2020 is our top pick for beginners — clean, detailed, and affordable.
Dynamic Microphones are more rugged and forgiving in untreated rooms. They handle high SPL sources — kick drums, guitar amplifiers, brass instruments — without distorting. Because they reject more ambient noise, they’re also ideal for vocals in rooms with poor acoustic treatment. The Shure SM57 is an industry staple for instruments; the Shure SM58 is the equivalent for live vocals.

Ribbon Microphones offer a vintage warmth and natural high-frequency roll-off that flatter many instruments and voices. They’re more fragile and expensive — best reserved for Stage 3 and beyond.
How Many Microphones Do You Need to Start?
Start with one condenser mic and one dynamic mic. This combination covers the vast majority of studio recording scenarios. Add more specialized microphones as your projects demand.
Pro Tip: If you’re recording in an untreated bedroom, a dynamic microphone with a tight cardioid pattern will reject more room noise than a condenser. Consider the best condenser microphones once your acoustics are sorted. Alternatively, see our picks for the best condenser mics under $100 if you’re on a tight budget.
5. Pop Filter — Protect Your Mic & Clean Up Vocals
A pop filter is one of the most cost-effective investments in any studio. Placed between the singer’s mouth and the microphone capsule, it dissipates the burst of air from plosive consonants (especially “P” and “B”) that would otherwise cause a low-frequency thud in your recording. It also catches saliva droplets that would degrade a condenser’s diaphragm over time.

Pop filters are primarily used with condenser and ribbon microphones due to their high sensitivity. Most dynamic mics have a built-in foam windscreen, though an external pop filter improves vocal clarity on those too.
For group vocal sessions where multiple singers share a mic, opt for a dual-layer filter — the two layers provide significantly better plosive rejection. The Nady MPF-6 is a reliable budget option; if you want something premium, look at the Stedman Proscreen XL.
→ See our picks for the best microphone pop filters.
6. Studio Headphones — Closed-Back for Tracking
Studio headphones serve a fundamentally different purpose to your everyday listening headphones. Consumer headphones add bass boost and tonal coloring to make music sound more exciting — exactly what you don’t want when editing a mix. Studio headphones are engineered to be honest and flat, revealing problems in your recordings so you can fix them before they reach your audience.
For Stage 1, focus on closed-back headphones. Their sealed cups provide excellent isolation in both directions: musicians can’t hear the click track leaking into the room, and your microphone won’t pick up headphone bleed during overdub sessions. The Audio-Technica ATH-M50x is the industry standard in this category — critically acclaimed, durable, and highly accurate.

As your studio grows, consider adding a pair of open-back headphones (like the Sennheiser HD 600) for mixing sessions — their more natural soundstage makes it easier to judge stereo width and depth. But closed-back first.
→ Read our full guide to the best studio headphones for music production.
7. XLR Cables — The Studio’s Nervous System
XLR cables are the most common cable type in professional audio, used to connect microphones to interfaces, preamps to converters, and virtually every piece of balanced analog gear in a studio signal chain. They use a 3-pin balanced connection that actively rejects electromagnetic interference (EMI) and radio frequency interference (RFI) — critical when cables are running near power supplies, computers, and other electronic equipment.
What to look for: Oxygen-Free Copper (OFC) conductors provide better conductivity and signal purity. Gold-plated contacts resist corrosion. Heavy-duty strain relief at the connectors prevents wire breakage from repeated bending.
Start with at least two quality XLR cables — one for your primary microphone and one spare. Brands like Mogami Gold, Canare L-4E6S, and the budget-friendly Amazon Basics XLR are all reliable choices at different price points. Don’t cheap out here — a faulty XLR cable introduces noise and signal loss that no amount of plugin processing can fix.
8. Microphone Stand & Shock Mount
A solid mic stand and shock mount are the unsung heroes of clean studio recordings.
A boom mic stand is the most versatile option for studio use — the adjustable arm lets you position the microphone precisely above, below, or in front of a sound source without the stand appearing in the way. For desktop vocal recording, a desktop/table boom stand or a scissor arm mount is more convenient. The Hercules MS533B and K&M 21090 are widely trusted studio floor stands.
A shock mount suspends your condenser microphone within a web of elastic bands, physically decoupling it from the stand. This prevents low-frequency mechanical vibrations — footsteps, desk knocks, HVAC rumble — from transferring through the stand into the mic capsule. For condenser mics, a shock mount is nearly as important as a pop filter.
Stage 2: The Intermediate Studio Checklist — Accuracy & Acoustics
You’ve been recording for a few months. The tracks are coming together — but something still isn’t translating right when you listen on other systems. That’s the signal to level up. Stage 2 is about accuracy: getting your monitoring right, treating your room, and building a workflow that doesn’t slow you down.
9. Studio Monitor Speakers — The Truth-Tellers
Studio monitors are the most important investment you can make for mix quality. Unlike hi-fi speakers or computer speakers that sweeten the sound to make listening more enjoyable, studio monitors present audio as flat and uncolored as possible — exposing every flaw, every frequency imbalance, and every dynamic inconsistency in your mix. If it sounds good on studio monitors, it’ll sound good everywhere.

Choosing the Right Monitor Size
5-inch monitors (like the JBL 305P MkII or Yamaha HS5) are ideal for home studios and bedrooms. Their near-field design means they’re meant to be positioned close to the mix position, reducing the influence of room acoustics. 8-inch monitors (like the Yamaha HS8 or Adam Audio T8V) provide deeper bass extension and suit larger rooms — but require better acoustic treatment to get the most from them.
Our Top Recommendation: JBL 305P MkII
The JBL 305P MkII Powered Studio Monitors (Pair) offers professional imaging, a wide sweet spot, and accurate mid-range detail at an accessible price point. The Image Control Waveguide technology produces a genuinely impressive stereo field for its size.

Always choose active (powered) monitors over passive ones for a home studio — built-in amplifiers are matched to the drivers and save you the cost and complexity of a separate power amplifier.
→ See our picks for the best studio monitor speakers and the best budget studio monitors.
The Equilateral Triangle Rule
Position your two monitors and your listening position (your head) in an equilateral triangle, with each side roughly equal in length — typically between 3 and 5 feet. Angle each monitor inward so the tweeters point directly at your ears. This gives you the most accurate stereo image and the widest “sweet spot.”
10. Monitor Isolation Pads — Stop False Bass
When studio monitors sit directly on a hard desk surface, low-frequency vibrations transfer through the surface and cause the desk itself to resonate — essentially turning it into an uncontrolled bass amplifier. The result is artificially boosted low end in your monitoring environment, leading you to mix the bass out of your tracks and end up with thin-sounding results on other playback systems.
Monitor isolation pads — dense foam or rubber wedges placed under each monitor — break this coupling and eliminate the false resonance. The Auralex MoPad Monitor Isolation Pads are the industry standard and also allow you to angle your monitors upward or downward to fine-tune the sweet spot.
11. Acoustic Treatment — The Most Overlooked Step
Your room is the biggest “plug-in” in your entire signal chain — and it’s one most home producers ignore. Acoustic treatment doesn’t make your room soundproof; it makes your room sound better by controlling how sound waves behave inside the space.
Bass Traps
Low-frequency sound waves are long, powerful, and accumulate in corners where two or three room boundaries meet. Bass traps — thick, dense absorptive panels placed at 45° across room corners — intercept these waves before they build up into problematic resonances that obscure the low end in your mixes. Start here. The Mybecca 12-Pack Acoustic Bass Traps offer excellent value for corner treatment.
Acoustic Panels
Parallel flat walls create strong reflections and flutter echo — the distinct ringing you hear when you clap in an untreated room. Acoustic panels (mid/high-frequency absorbers) mounted at “first reflection points” on the side walls, ceiling, and rear wall dramatically reduce this coloration. Use the mirror trick to find first reflection points: sit at your mix position and have someone move a mirror along the side walls; wherever you can see a monitor in the mirror is a first reflection point that needs treatment.
Acoustic Diffusers
Where absorbers reduce energy, diffusers scatter it — breaking up reflections without making the room feel “dead.” Wooden diffuser panels on the rear wall behind the mix position are a classic combination with absorption on the sides and ceiling. Brands like ATS Acoustics and Acoustimac offer affordable options.
12. Studio Workstation — Your Production Hub
A dedicated studio desk is more than a place to put your gear — it’s a purpose-built ergonomic workspace designed to put every control, screen, and monitor exactly where it needs to be for productive sessions. Studio desks typically feature raised monitor shelves (to bring tweeters to ear level), keyboard trays, cable management systems, and rack mount space.

The Omnirax Presto 4 and Ultimate Support Nucleus-Z are popular mid-range options. A comfortable studio chair is equally important — you’ll be spending long hours at this desk. Prioritize lumbar support, adjustable armrests, and breathability. A good ergonomic chair is an investment in both productivity and physical health.
13. MIDI Keyboard Controller — Play Your Ideas
A MIDI keyboard controller doesn’t make sounds itself — it sends MIDI data to trigger and play virtual instruments inside your DAW. This turns your software synthesizers, samplers, and drum machines into playable instruments, allowing you to input musical ideas naturally rather than laboriously clicking them in with a mouse.
Keyboard controllers range from compact 25-key units ideal for a tight desk setup to full 88-key weighted controllers that feel like an acoustic piano. For most producers, a 49-key semi-weighted controller hits the sweet spot between playability and desk footprint. The Arturia KeyLab Essential 49 and Akai MPK Mini MK3 (25-key) are both excellent value options.
For pianists who want authentic feel, look for graded hammer action (heavier in the bass, lighter in the treble). For producers focused on synths and beats, synth action keys with responsive velocity sensitivity are more important. Check out our full list of the best studio monitors and production tools to round out your setup.
14. External Storage & Backups — Protect Your Work
This is one of the most commonly overlooked items on a studio equipment checklist — and the one that causes the most heartbreak when neglected. Audio projects, sample libraries, plugin presets, and session files consume enormous amounts of hard drive space, and a single drive failure can wipe out months of work in seconds.
The Rule of Three
Keep three copies of every important project: the original on your studio computer, a working backup on an external SSD for fast access to current projects, and a cloud or off-site backup for disaster recovery. Tools like Backblaze ($99/year) provide unlimited cloud backup for your entire computer — one of the best insurance policies in any studio.
For sample libraries, an external SSD is essential. Large sample libraries (Spitfire Audio, Kontakt libraries) can exceed 500GB or more. Running them from a slow HDD introduces latency and stuttering. The Samsung T7 SSD and WD Black P50 are both fast, portable, and reliable options designed for demanding creative workflows.
Stage 3: The Semi-Pro Studio Checklist — Expanding Your Capabilities
At this stage, you’re ready to record more than one or two people at a time. Bands, live ensembles, and complex multi-mic setups all require a more sophisticated signal chain. This is also the stage where your studio becomes a commercial operation — clients will pay by the hour, and your gear needs to handle the workload.
15. Rack Mount — Organize Your Outboard Gear
A rack mount case is the backbone of an organized semi-pro studio. It provides standardized mounting for your outboard gear — preamps, power conditioners, headphone amps, and patch bays — keeping everything accessible, secure, and properly ventilated.
Choose a rack with extra empty spaces beyond what you need today. Those empty slots serve two purposes: they plan for tomorrow’s gear, and they allow air to circulate and cool the equipment efficiently. Cover empty slots with blank rack panels (like the Navepoint 1U Rack Blanks) for a professional appearance and to aid airflow management.
16. Multi-Channel Microphone Preamp
When you need to simultaneously record a full drum kit (typically 8+ microphones), a live band, or any multi-mic setup, your audio interface’s built-in preamps may not provide sufficient channels or gain quality. A dedicated external preamp solves both problems.
External multi-channel preamps offer features the interface’s basic preamps lack: individual phase reverse, pad switches, low-cut filters, and — most importantly — higher maximum gain (70dB+) needed by low-output dynamic and ribbon microphones. They also provide a significant improvement in sonic character. The Focusrite ISA828 MKII and PreSonus DigiMax D8 are both proven choices here, connecting to your interface via ADAT optical or Thunderbolt.
17. Headphone Amplifier — More Outputs for Band Sessions
Most audio interfaces provide only one or two headphone outputs. When you’re recording a band, every musician needs their own headphone mix — the drummer needs to hear more click, the vocalist needs more reverb on their voice. A headphone amplifier adds multiple independent outputs, each with its own level control.
The Behringer Powerplay HA8000 provides eight independent headphone channels at a very accessible price point. For higher quality and more flexible monitor mixing per channel, the Behringer Powerplay P16-M personal monitoring system is a significant upgrade used in many professional touring rigs.
18. Power Conditioner — Protect Your Investment
No studio at Stage 3 should operate without a power conditioner. Your studio is now housing thousands of dollars of sensitive electronics — all of which are vulnerable to power surges, spikes, and “dirty” power from your electrical supply.
A power conditioner consolidates all the power draws for your rack-mounted gear into a single unit with surge protection and — critically — built-in EMI (Electromagnetic Interference) and RFI (Radio Frequency Interference) filters. These filters scrub the electrical noise from your power line before it enters your gear, reducing the subtle hiss and hum that can contaminate recordings. The Furman M-8X2 Merit Series is the standard beginner/intermediate unit; for heavier-duty setups, the Furman PL-8C adds power factor correction and advanced filtering.
19. DI Box — Clean Direct Recording for Guitar & Bass
A Direct Injection (DI) box is an essential but often overlooked piece of studio infrastructure. It converts the high-impedance, unbalanced signal from a guitar or bass directly into a low-impedance, balanced signal compatible with your microphone preamp or interface. This allows you to record a clean, noise-free “dry” DI track that can later be re-amplified through real or virtual amp simulators — a technique called re-amping.
For bass guitar and electric guitar recording without an amp in the room, a quality DI box is invaluable. The Radial J48 (active, phantom-powered) and the Radial JDI (passive) are both professional standards trusted in studios worldwide. For budget-conscious beginners, the Behringer Ultra-DI DI20 is a reliable starting point.
20. Monitor Management System
A monitor management system lets you switch between multiple pairs of monitors, control headphone mixes, and adjust overall listening volume — all from a single rack-mounted or desktop unit. This is how professionals check their mixes across different playback environments (big monitors → small consumer speakers → mono reference) without constantly re-patching cables or adjusting software settings.
The Mackie Big Knob Studio and PreSonus Monitor Station V2 are popular mid-range options that add talkback microphone functionality, essential for communicating with performers in an isolation booth during tracking sessions.
21. Virtual Instruments & Plugins — Your Software Rack
The explosion of high-quality third-party plugins is one of the most transformative developments in modern music production. A well-chosen plugin library gives you access to instruments and processors that would cost hundreds of thousands of dollars in hardware form.
Essential Plugin Categories
EQ Plugins: The FabFilter Pro-Q 3 is the industry benchmark for surgical, high-quality EQ. For analogue-modeled color, the Waves SSL E-Channel or Plugin Alliance Neve 1073 are widely used.
Compressor Plugins: The Waves CLA-76 (based on the classic 1176) and FabFilter Pro-C 2 cover the full range from punchy limiting to transparent bus compression.
Reverb & Delay: Valhalla Room ($50) is one of the most beloved algorithmic reverbs at any price. Echoboy by SoundToys handles delay duties in thousands of professional sessions.
Virtual Instruments: Native Instruments Kontakt is the standard sample player, with an enormous ecosystem of libraries for every instrument imaginable. Serum by Xfer Records is the go-to wavetable synthesizer for electronic music production.
22. Electronic Drum Kit
Recording an acoustic drum kit at home is challenging — it requires a large room, significant acoustic treatment, and multiple microphones and preamp channels. An electronic drum kit sidesteps all of these requirements while still delivering the natural feel of playing on real drum pads.
Modern e-kits come loaded with preset sounds, multi-velocity sensitivity, and direct USB/MIDI connectivity to your DAW. They’re significantly quieter than acoustic drums, making them ideal for apartments and home studios. The Alesis Nitro Mesh Kit is an excellent entry-level option with mesh heads that provide a far more realistic rebound than rubber.
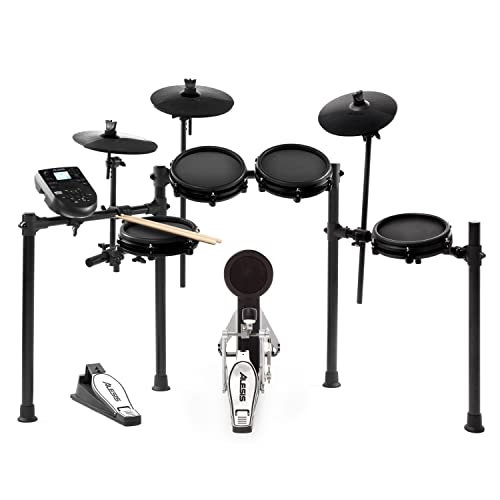
For professional-quality feel, the Roland TD-17KVX2 V-Drums is the benchmark.

Stage 4: The Professional Studio Checklist
Very few studios reach Stage 4, and those that do are already delivering professional, commercial-quality work at Stage 3. The additions at this stage offer incremental improvements — meaningful at the highest levels of the industry, but difficult to distinguish in most real-world listening contexts.
23. Standalone A/D Converters
Your audio interface already performs analog-to-digital (A/D) and digital-to-analog (D/A) conversion. Standalone converters — such as the Lynx Aurora(n) or the Apogee Symphony I/O MkII — offer higher-quality conversion circuits with lower noise floors, better dynamic range, and improved stereo imaging. The sonic differences are real but subtle, and only meaningful in the context of a studio chain where every other link is already optimized.
24. Master Clock (Word Clock)
When multiple digital devices are connected in a studio — converters, digital consoles, effects processors — they all need to sample audio at exactly the same rate, synchronized to the same clock signal. Timing errors between devices produce “jitter,” which manifests as smearing of the stereo image and subtle sonic degradation.
A dedicated master clock (such as the Antelope Audio 10MX or the Apogee Big Ben) provides an ultra-stable, ultra-precise timing reference that all connected digital devices slave to, reducing jitter and improving overall sonic coherence. For studios operating with a single interface connected to a computer, a master clock provides minimal audible benefit. At Stage 4 with multiple converters and digital outboard gear, it becomes more meaningful.
Strategic Studio Setup Tips
The Equilateral Triangle Rule (Monitor Positioning)
Position both monitors and your mix position at the three points of an equilateral triangle, with each point roughly 3–5 feet apart. Angle the monitors inward so each tweeter is aimed directly at your ears. This provides the most accurate stereo image and widest sweet spot. If your room allows, position the listening position at roughly one-third of the room’s length from the front wall.
Cable Management & EMI Avoidance
Route audio (XLR, TRS) cables at 90-degree angles to power cables, never parallel. Electromagnetic interference from power cables can induce noise in audio cables running alongside them. Use cable ties, cable raceways, and Velcro straps to keep your studio tidy — a tangled mess of cables isn’t just an eyesore, it’s a troubleshooting nightmare and a potential source of signal degradation.
Ergonomics & Lighting
Your ears can’t make good decisions when your body is uncomfortable. Set your studio chair height so your forearms rest at keyboard level without shoulder strain. Position your main monitor screen slightly below eye level to reduce neck fatigue during long sessions. Warm, indirect lighting (around 3000K color temperature) reduces eye strain during long mixing sessions without competing visually with your screen displays.
Frequently Asked Questions
Can I record professionally on a $500 budget?
Yes — with some important caveats. A $500 budget can get you a capable Scarlett Solo interface, an Audio-Technica AT2020 condenser, a pair of decent closed-back headphones, and a budget DAW. The biggest limitation at this budget isn’t the gear — it’s the room. Untreated room acoustics will do more damage to your recordings than budget gear. Prioritize even basic acoustic treatment (moving blankets, bookshelves filled with books) and you’ll get results that surprise you.
Should I buy a Mac or a PC for music production?
Both platforms are fully capable of professional music production. Macs offer the exclusive Logic Pro and GarageBand ecosystem, Core Audio’s low-latency performance, and tight hardware-software integration. PCs offer greater customizability, more raw performance per dollar, and a broader range of hardware options. If you’re already in one ecosystem and have existing hardware, stay there. If starting fresh, a Windows laptop with 16GB RAM and an SSD offers excellent value for the price.
What is the single most important piece of gear?
Your ears — followed closely by your acoustic treatment. Every dollar you spend improving your monitoring environment (acoustic treatment, quality studio monitors, quality headphones) returns more value than the same dollar spent on any other category of gear. A $150 pair of honest headphones in a treated room will produce better mixes than $1,000 headphones in an untreated space.
Do I need studio monitors if I have good headphones?
Both are valuable and serve complementary purposes. Headphones excel at isolating fine details and catching subtle issues, but lack the physical sensation of bass and can produce unrealistic stereo imaging. Studio monitors reveal how your mix translates to real-world playback systems — speakers in cars, phones, TV sets. Professional engineers typically use both, cross-referencing their mixes between the two.
What’s the best first microphone for recording vocals?
For a treated room, the Audio-Technica AT2020 is the outstanding value choice at its price. If your room is untreated, consider a dynamic microphone like the Shure SM7B — its superior background noise rejection will produce cleaner vocal tracks in imperfect acoustic environments. Check our condenser mics under $100 guide for more options.
Final Thoughts
Building a recording studio is a journey, not a purchase. The most important thing at every stage is to keep making music with what you have, and add gear strategically as your specific needs demand it. A bedroom producer with a laptop, a $100 interface, and genuine talent has produced chart-topping records. The gear matters — but only as much as the person behind it.
Bookmark this recording studio equipment checklist and revisit it as your studio grows. Tick items off the interactive list above as you acquire them. And most importantly — keep the sessions going.
Have questions about any item on the list? Leave a comment below or explore our in-depth gear guides: audio interfaces · studio monitors · headphones · DAW software · condenser microphones.