Audio compression is a essential for audio editing. A compressor reduces the sound waves into a smaller amplitude, making the audio less dynamic. For example, a track with lots of changes in volume would be considered dynamic, while a less dynamic track will have more consistent volume throughout.
Compressors regulate the sound levels of loud and soft parts so that the volume is more consistent throughout a track. This evens out the mix, making it easier to hear each individual component. Compression is particularly important for recording human voice, as vocals tend to be very dynamic in nature.
There are two types of compression: upward and downward. Upward compression makes the quiet sounds louder while downward compression does the opposite by making loud noises quieter. Both can be applied simultaneously as well.
What is an audio compressor?
An audio compressor is a device that reduces the dynamic range of an audio signal. Dynamic range is essentially the difference between the loudest and quietest parts of a sound. A compressor is used to even out the levels of a sound by reducing (or compressing) the loudest parts, while also amplifying the quieter parts.
Why use compression?
Compression can help add punch and warmth to a sound. It can make slight variations in volume more subtle, while also giving the listener a feeling of “louder”. A compressor is essentially an automatic volume control that works by reducing the level of louder sounds while boosting softer ones.
The most common uses for compression in music
Most commonly compression is used to help bring up vocals that are too low in volume. A compressor can also be used to smooth out the spikiness of percussive sounds, making them more manageable when they compete with each other instruments for attention. Compression is used by almost every genre of music, but it is especially helpful when recording rock or pop music.
Audio Compressor Settings
The most important part of using a compressor effectively is setting its controls correctly. This involves deciding how much compression to apply, as well as how fast or slow that compression should be.
The most common controls are:
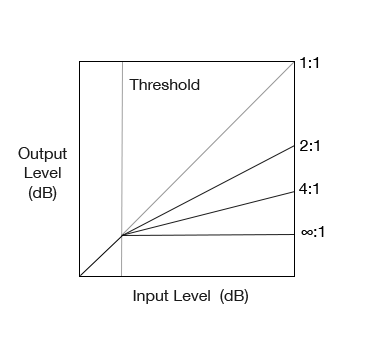
1) Threshold – This is the level at which compression begins. For example, if you set your threshold to -20 dB, the compressor will only begin working once it detects sounds louder than 20 decibels.
2) Ratio – This is essentially a multiplier that determines how much the compressor affects a sound once it is louder than the threshold.
– Ratio 2:1 – for every two decibels above the threshold only one will be outputted by the compressor.
– Ratio 20:1 – for every twenty decibels above the threshold only one dB will output. So that’s is called ‘limiting‘.
– Ratio 1:1 – for every 1 decibel above the threshold, also 1 decibel will output. That’s a neutral position, and you will have no compression at all.
3) Attack – This control deals with the attack time of the compression, which may also be referred to as “response.” In general terms, this deals with how fast or slow the compressor reacts to large differences in amplitude.
4) Release – This control deals with the release time of the compression, which may also be referred to as “recovery.” In general terms, this deals with how fast or slow the compressor stops compressing once it passes below the threshold.
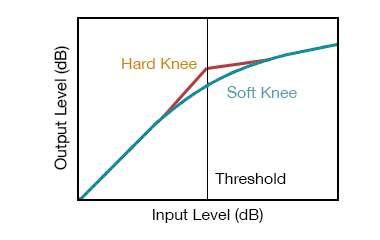
5) Knee – This control deals with what’s known as “soft” or “hard” knee. Hard knee compression quickly builds to the maximum level, resulting in a more dramatic effect. Soft knee compression gradually increases the amount of compression applied, resulting in a more gradual change.
5) Make-up gain – This control is often labeled “make-up” or “output,” but the idea behind it is essentially to boost the volume of the signal once it has been compressed.
6) Output – This controls how much amplified output signal is sent out from the compressor. You can also use output level settings to prevent overloading of your equipment if you are recording more gain than what is needed.
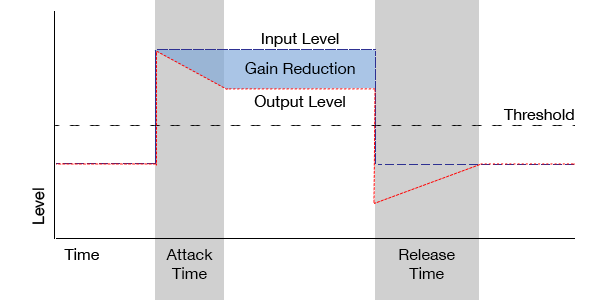
Deciding how to set these controls will be based on the quality of sound that you are trying to achieve, as well as your own taste in the final sound. It is also important to remember that compression settings should be unique for every song. What works best for one song might not work best for another.
Basic Compression Settings
Vocals
- Set threshold to get +/- 4 to 7 dB gain reduction
- Ratio 2:1 up to 4:1
- Fast/Medium Attack
- Fast/Medium Release
Loud vocals
- Set threshold to get up to 12 – 15 dB gain reduction (on peaks)
- Fast/Medium Attack
- Medium Release
- Ratio 4:1 up to 8:1
Drums (Drums – group)
- Set threshold to achieve 4 to 8 dB gain reduction
- Fast Attack
- Fast/Medium Release
- Ratio 2:1 up to 4:1
Acoustic guitar
- Set threshold to achieve up to 5dB gain reduction
- Fast Attack
- Medium Release
- Ratio 2:1 up to 4:1
Electric guitar
- Compress more
- Fast Attack
- Fast/Medium Release
- Ratio 2:1 up to 10:1
Bass
- Set threshold to get 3 to 7 dB gain
- Medium Attack
- Fast/Medium Release
- Ratio 2:1 up to 6:1
Mixes
- Set threshold to get 2 to 4 dB gain
- Fast/Medium Attack
- Fast/Medium Release
- Ratio 2:1 up to 4:1
Always keep in mind that these are guidelines and maybe you have to tweak a little bit of the settings to get the sound that you’re looking for.
4 common compressor types
When purchasing a stand-alone compressor, you can expect to have at least 4 standard types of compressors from which you can choose. These include:
1) VCA – This stands for “voltage-controlled amplifier.” Essentially, this is considered one of the more accurate and versatile types of compression. The controls are also very simple, although the settings may take some practice to master.
2) FET – This stands for “field-effect transistor.” This is the most popular type of compression, especially when used in recording studios. A limiter is another common type of FET compressor.
3) Optical compressor – This type of compressor is similar to the VCA in that it has very “clean” compression, but they both operate in slightly different ways.
4) Tube – These are based on vacuum tubes and usually give a more warm tone when compressing. They can also be noisy at times, but this may be desired for some situations. Some tube This is a type of compression that uses light to detect the amplitude of the sound.
Compression Tips & Techniques
Here are a few tips and tricks to help you use compression in the most effective way:
- Always record without compressing first. You can then compress during playback rather than recording, which will eliminate any unwanted artifacts.
- Turn up the threshold and ratio controls in small increments to give yourself more control over what is being compressed.
- Set the attack and release controls to taste. If you are looking for a more aggressive sound, choose higher values for both of these than what you would use in a softer song.
- Limit how much compression is applied by setting your threshold to the loudest part of the song. This will help prevent over-compression and result in a more natural sound.
- Experiment with what works for you, as every song will have slightly different requirements for what settings work best.
- Stay away from adding make-up gain until after you have compressed your track. If you add it before, then it will increase the overall volume of both the uncompressed and compressed parts of your track, which can result in over-compression.
- Through trial and error, find what sounds best for your song. In some songs, you may want to do more aggressive compression with a higher ratio, while in others you may want less aggressive compression with a lower ratio.
- Remember that what sounds good is not always what works best for your track. It can be tempting when mixing to add what you think will work, but it is important to always go back and listen again you may want a completely flat sound with no compression at all, while other songs might require a more aggressive approach to what gets affected by the compressor. The key is to experiment and trust your ears!
- For adding punch to vocals without flattening the dynamics, try using downward expansion instead of compression. This is an advanced technique that takes advantage of what a compressor does in order to reduce the volume of what passes below the threshold. It can be used for other parts of songs as well (i.e. drums, bass guitar).
- To avoid what might be called distortion or pumping, set the attack time to 0ms and release time around 300-400 ms. This will help control how quickly the compressor begins working on what gets compressed, which can sometimes result in what sounds like distortion.
- As with any effect or tool in music production, there are no rules about how compression should (or shouldn’t) be used. Use what you know about what sound best for your music, and trust your ears to tell you what works best.
Compression FAQs
Can you hear a compressor in action?
Yes, this is what a compressor does. If you listen to music with a lot of compression in it, what you will hear is essentially what would have been the quieter parts become louder and vice versa. The peakier the sound before compression is applied, the more noticeable it will be after compression.
Is a compressor the same as a limiter?
No, although what they both do is essentially the same. Compressors are used throughout mixing to get what is being compressed louder without losing all the dynamics contained within it.
Limiters are what is used at the end of a signal chain to ensure that what is being recorded does not exceed a certain volume, and can sometimes be used for what gets recorded in order to get a feeling of extra loudness.
When using a compressor, what should I be listening for?
When using a compressor, always aim for what sounds best with the other elements in your song. This may require using fewer compression settings (e.g., lower ratio and longer attack time) to achieve a gentler sound.
What is brick-wall or hard-knee compression?
Brick wall or hard-knee compression is similar to a Limiter in how it works once the level goes above the threshold, everything is immediately compressed. For compressors, people generally set them with a soft knee so that there’s a slow transition into compressing the audio as opposed to an abrupt one.
Can I use compression on what I’m mastering?
Yes, compression can be useful in mastering to make what you’re working on sound more powerful or exciting. However, keep in mind that what sounds good to you might not always be the best option for your project as a whole.
Can compression make music sound better?
Yes, compression can be used to make music sound more impactful or powerful. However, it’s important to use compression in moderation and to always trust your ears when making decisions about what gets compressed.